Iris arrived full of mischievous plans and non-stop chatter! LOL She thought she and I should have a sewing competition involving embellishing jeans jackets. She wanted to make one for Sonja, so I made one for Julia. Sonja loves the Frog and Toad books, so that became our theme. The one Iris made for Sonja has different buttons sewn here and there on it representing one of the stories. I put a butterfly on the shoulder of Julia's because she liked the one I had on my shirt.
Friday, July 19, 2019
Spicy Spiral Table Runners
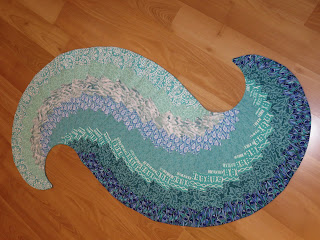
I made this Spicy Spiral Table Runner as a wedding gift. I picked fabrics to coordinate with dishes that were in their wedding registry. It's a fun pattern to pick fabrics for and also to make.
This is a smaller version of the Spicy Spiral Table Runner that I made for myself. I call this my Garden Spiral Table runner.
Cargo nets for the boat
The cargo nets in our boat needed to be replaced. I used some fabric scraps, fabric from a laundry bag (The Container Store) for netting, and the original bungie cord to make these.
Prayer shawl and wedding afghan

Yarn: Premier Puzzle (3 skeins)
Color: Riddle
Needle size: 10 1/2 US
Pattern: One row; picot edging on both ends
Cast on: 106 stitches

This afghan is a wedding gift for my nephew and his bride who were married in May. They are Seattle Mariner baseball fans, so I picked a diamond-shaped pattern (Raised Diamond Points by Laura Cunitz at Ravelry) in a Mariner-blue yarn (Lionbrand Heartland - color: Olympic). It's the first time I've knit from a chart, so was a learning experience.
Yarn: Lionbrand, Heartland (6+skeins)
Color: Olympic
Needle size: 9 US
Pattern: Raised Diamond Points (Ravelry)
Cast on: 187 stitches
Size: 46"x60"
Wednesday, July 17, 2019
Tissue Box Cover Tutorial
I have tissue box covers in nearly every room of my house. Each one is made a little differently, so whenever I go to make another one, I'm never quite sure how to do it. I took some pictures this time, so that if it worked out (which it did), I could make a tutorial for myself. Decided I may as well share …
You will need (for this size box):
Note: These same directions can be followed for any size tissue box. Just cut the Stiff Stuff the exact measurements of the outside of the box.
|
Cut a 4 5/8” square of Stiff Stuff (SS)
for the top of the box.
Spray with basting spray and lay it on
top of a piece of batting.
Cut around batting to the edge of the SS.
Using the top of an empty tissue box
for a pattern, draw an oval on the SS and cut out the center.
Cut two pieces of the main fabric
about 1” larger than the SS (5 5/8” square).
With two fabric squares right sides
together, spray baste the SS and batting with batting side down to the
fabric.
|
||
Stitch around the center oval right
next to the edge of the SS.
|
Cut out the center fabric and clip
curve to stitching line.
|
|
Turn fabric
through the center and give it a good press.
|
You can finish the top with quilting
if you wish. I just top-stitched around the opening using a 3-step straight
stitch.
|
|
Cut 4 SS pieces for sides 4 5/8” x 5 ¼”.
Use basting spray to affix a piece of batting to each piece of SS and trim
batting to the edges of the SS. Sandwich with a piece of fabric that is at least 1/2" larger all the way around.
Quilt this as you wish (I used a
serpentine stitch), but some stitching in the center is required to hold the
layers together, otherwise, the SS will be loose inside the box cover. I
found that if you do not stitch over the side edges of the SS (the 5 ½”
sides), when you sew the seams they will tuck behind the SS and have a nicer
appearance inside the box cover.
|
Match up the top of one of the side
pieces with one edge of the top piece. You can feel the SS with your fingers
to line it up just right.
Sew a seam right next to the SS. Only
sew to the corner, not beyond. An edge joining foot or open toe foot is perfect for this
step.
|
|
Trim the seam
with pinking shears close to stitching. You could zig-zag it or use fray
check or a narrow serge stitch. Technically, it might not really need
anything.
|
Here’s what you’ve
got:
|
|
Continue adding the sides to the top
of the box.
Join each side seam in the same way with the box cover inside out. Clip seams with pinking shears. Then carefully turn it right side out. |
Or to use binding: Turn box right side out. Trim the excess fabric along the bottom of the box.
Look inside, and you can tuck the
seams under the SS.
|
|
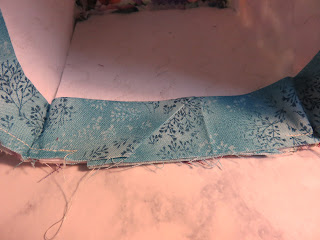
Fold one end of binding at a 45 degree
angle and press. Cut the end of the binding off about ¼” away from the fold.
Press binding in half. This allows for
the tuck-in method of finishing the binding. I don’t think it would work to
try to sew the two ends of the binding together.
Leaving a tail at the beginning, sew
binding to bottom of box on the inside of the box using ¼” seam. (It would
have been easier to put the bottom of the box around the free arm of my
machine. That’s what it’s there for.)
|
||
When you come to the end of the binding, cut it the right length to tuck
inside the beginning end. Then continue sewing to your starting point.
|
Turn the binding to the front side and
top stitch it down. (Sorry, no picture.) I used the serpentine stitch again.
Use it or gift
it!
|
Subscribe to:
Comments (Atom)


